Wednesday, January 8, 2014
Botany Bay Completed!
Lost in Space since 1996!
Here's the S.S. Botnay Bay in all her finished painted glory! She came out fantastic!
All the paneling is airbrushed on, with pencil detailing on some areas to give more definition and some pastel weathering to give it a chalky dusty look. I didnt want to overpower the sleek lines and simple detailing of the ship with weathering that was too heavy or out of scale. It fits right alongside my 1/350th scale Enterprise which, with the exception of the rust ring and extremely faint penciled on gridlines, is otherwise clean.
Such a great desing for a ship! The spindly radiators on the back end wound up snapping off twice during assembly, luckily after painting no more incidents have occured
The overall size was again kept slightly smaller than canon references. I wanted it to look like this could have (as is seen in book covers and photos from the various series) possibly been launched from within the atmosphere atop a booster stack. Plus it makes the enterprise look alot bigger.
Some simple greeblies along the back end really give it that TOS feel, much like the sparingly placed yellow and red bits of plumbing/widgets along the enterprise corridors.
A nice shot from 1996 of the Botnay Bay zipping away from us at archaic speeds... wonder what will happen to those guys on board?
Coming up next! I'm am goig to be making some more small craft, Charles Evans favorite old clunker the Antares, the Tholian webspinner, and the "No Herbert's Allowed" Aurora! I am also looking to the Animated series for inspiration and will probably be working on some of the smaller auxillary craft as well as the villain ships from that series!
Monday, September 9, 2013
Botany Bay... OH NO!
"I thought you said it couldn't possibly be an earth ship?"
As a companion piece to the 350 scale Enterprise I scratchbuilt a 1:350th Botany Bay to go alongside it. (Based on plans drawn by Phil Broad and photos of the studio model)
The ship itself is made from Styrene overall with the exception of a wood dowel for the head which was then clad in styrene for the flat faces and puttied and sanded until firm and smooth. Some close enough kit parts were added on the rear end of the ship to represent the greeblies on the original. Some of the panel work that is shown as raised on the studio model will be represented as paint on this ship. I'd like to keep it as subtle as possible much like the gridlines on the saucer of the Enterprise.
A stand was made to match the Big E's, from a Plastruct acrylic hemisphere and Aluminum rod. overall build time has been about 12 hours on the little guy, not bad as a time killer when getting ready for work, or while watching some TV. A bit more putty work and priming and I'll be soldering some brass rod and screen together to make her rear heat sinks/antennas/strainers, then she'll be ready for paint!
You may notice the fronts and backs of the cargo pods are not backswept as on the studio model. This was a legitimately conscious decision. Growing up with the micro machines Botany Bay and having displayed it with my 1:1000th Enterprise for some time I got used to the flat pods and they seemed to make more sense in so far as fitting together as cargo modules so I kept them flat. For that matter I also kept the model slightly under scale, as the MM Botany Bay was to my old Enterprise, I think it makes the Big E a 'little' more impressive!
A little Bonus! If you ever wondered how large the Botany Bay, the Enterprise and the Bridge island of the CVN-65 Enterprise would be next to each other... NOW YOU KNOW!
CVN-65 piggybacking the Enterprise.
Thursday, September 5, 2013
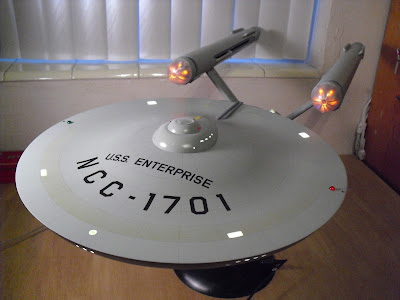
USS Enteprise 1:350 Finished!
A milestone in my model building! This is the Star Trek kit I have waited a lifetime for!
Worked hard to smooth out the gridlines on the saucer. After the hull color was applied they were penciled back in with a fine point (Very hard lead) drafting pencil and a compass rule. Rust ring was airbushed very subtly. At certain angles they appear and disappear giving the ship its 'As Seen On TV' appearance.
I think I was the first person to finish one of these with the gridlines puttied and filled in.
In the overhead shots you will notice the missing warp engine grills and vents on the pylons. I have yet to order the photoetched brass grills that will be inserted in these areas to replace the thicker less accurate kit parts.
Galileo is removable via a magnet placed underneath the shuttlebay floor.
Worked hard to smooth out the gridlines on the saucer. After the hull color was applied they were penciled back in with a fine point (Very hard lead) drafting pencil and a compass rule. Rust ring was airbushed very subtly. At certain angles they appear and disappear giving the ship its 'As Seen On TV' appearance.
Bottom gridlines were obliterated as well. Lines redrawn in hard lead.
I think I was the first person to finish one of these with the gridlines puttied and filled in.
In the overhead shots you will notice the missing warp engine grills and vents on the pylons. I have yet to order the photoetched brass grills that will be inserted in these areas to replace the thicker less accurate kit parts.
Galileo is removable via a magnet placed underneath the shuttlebay floor.
More finished pictures with a nice clean backdrop to come!
Wednesday, October 10, 2012
Millennium Falcon- Part Deux
Back with an update to the construction of the 32 inch Millennium Falcon model.
Many parts have been made since the first posting. Lots of flat surfaces and some detail chunks have been constructed.
Here is the Rear Landing Gear Housings. This is a huge surface area on the underside of The Falcon. Some kit substitutions have been made, and I will probably replace the very center piece with a corresponding kit part from an M-60A3 Tank. But for right now I am thrilled to have such a large piece of the ship constructed. All landing gear doors are simply taped in place in order to facilitate their removal later on. Once the ships build is complete I will likely construct landing gear that can be slipped into the housings.
Seen here are the forward tips of the mandibles. These were created totally from scratch to get the louvred openings on the front. I am leaving open the possibility of putting headlights within them, that will be tackled once construction is complete and I am looking at a more fleshed out scheme for lighting the ship.
The large dish antenna stumped me at first but a quick visit to pearl art supply revealed Plastruct acrylic caps in the perfect 3 inch diameter for the build. N scale handrails and a cone from a 1/200th Saturn V provided the bulk of the detailing for the front of the dish. The rear was further detailed using PVC tubing, styrene strip and Kits parts from Tamiya's 1/35th Matilda tank. The front and back still have a good bit of detailing before they are called finished.
The bits seen above fit within two of the hull cutout openings on either side of the engine deck. These were two of the more fun pieces to scratch since they also used plenty of kit parts. However the rightmost one will actually wind up being used within the mandibles and a more accurate piece will take its place after discovering the bulk of the parts that make up its detailing were actually available in a correctly scaled kit.
Many More bits have been constructed and shot, and even more have been built including one of the quad laser cannons, the ingress/egress ramp, the mandible upper and lower surfaces and more. Updates to come very soon!
Friday, August 31, 2012
Millennium Falcon - Week 1
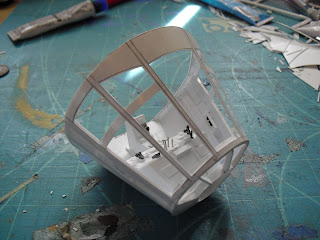
Presented here is the beginning of my scratchbuild of a 32 inch Millennium Falcon, thats pretty much studio scale to the Empire Strikes Back filming miniature. I've started and will continue to build it in components. Naturally the cockpit came first as kind of a proof of concept build. It went together fantastically.
Included in the build is a non accurate to the filming miniature console and anteroom to the cockpit. These are to the best of my abilities beng made accurate to the full size set, using blueprints from the widely available star wars blueprints packet.
Also in the first round of components are the docking ports from either side of the ship. They still need kit details and I am working on a list of 1/72nd scale tanks, trucks and planes to buy in order to fully flesh out the ship.
What will set this build apart is proportionally, I am basing it on the 5 foot filming miniature from the first film, that one being much more pleasing to me aesthetically. In the end there will be some compromise and hybridization among the two, but the broad strokes will will likely favor the five footer.
There will certainly be more to come! Even the pieces shown still require more panelling work, detailing and kitbashing eventually. You can also expect this blog to host my build of the new Polar Lights 1/350th scale Classic Enterprise model to be released soon!
Subscribe to:
Posts (Atom)


