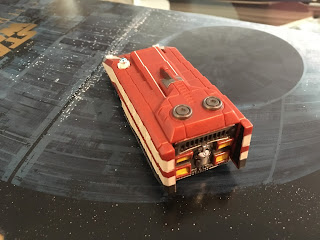
I recently came across this pretty great little pullback toy on clearance at a Disney store. For $2.99 they are a pretty decent representation in plastic of the Star Speeder 1000/3000 form Star Tours.
I've always been keen on owning a nice scale representation of the star tours ship so I grabbed one figuring I could do some work and bring it up to snuff, it turned out to be a nice spare time project.
The body itself for the most part was able to remain unchanged. The panel lines are a little deep, but I planned on hitting it with some automotive filler primer and doing a bit of sanding anyway to get rid of the ever-so slightly grainy texture of the surface. I also decided pretty early on to define a scale for it and potentially get rid of the R2 unit. The R2 put it at about 1/100 scale but I settled on something that would fit in with my other models so I'm calling it 1/144, also makes it a little beefier for a 40 person space bus.
The two worst areas of detail representation on the toy were the rear which was rounded and soft and the bottom of the ship which was somewhat simplified and a little inaccurate due to the pullback toy feature. I decided that it would be easiest to simply remove the bottom and start from scratch as well as cut away the rear end and simply build that up from styrene as well. In addition I would start by cutting out the front window and building a rudimentary interior.
Looking at the underside, one can see that the rather large cannons under the nose of the ship would need to be scratch built. I was able though to save certain parts here and there like the big vents under the chin of the ship on either side, although they would have to be completely relocated.
I can't say enough about Star Wars Chronicles and how handy it comes in when working on a project like this. The Star Speeder is fairly well represented and there are plenty of great shots of it. This worked out to be a lifesaver when looking for reference on all the little bits and bobs all over the ship.
The bottom of the ship was based around a 1mm styrene panel.
The panel was then cut into shape to work with some of the greeblies that will soon occupy the space.
The large chin vents were remounted onto the styrene panel up underneath the ship, closer to reference shots.
The large 'backpack', 'AC unit', whatever it is, on top of the ship was able to be unscrewed and I proceeded to cut off the 'horn' that sticks out in front of it. It will need to be rebuilt from scratch longer and much thinner, as well as in the correct shape.
After getting a rudimentary start on the bottom of the ship and getting most of the offensive areas removed, I turned my attention to the rear of the ship and the engine bank. I didn't photograph the whole process of building ip the engine panel, mostly because it went pretty quickly. This was definitely an area I was keen to get accurate.
Things were built up using an assortment of styrene sheets and textured panels in various patterns and thicknesses.
I was quite intrigued by the shapes of the engine cluster and the kit bashing used on the original model, some things I had thought were not very interesting about the craft grew on me more and more as I worked on it, funnily enough a fan of the Original Star Trek I actually found some funny similarities between this ship and the Starfleet shuttlecraft. I've always been pretty keen on the Star Speeder though, this really wound up being a long awaited and very fulfilling project.
Here's is a small comparison of the original back panel and its almost complete replacement.
With that I'll likely wind up this first post as there is PLENTY more to come. Overall there is enough good in this little toy that it was pretty easy to get a nice momentum going with the build and seeing my progress kept me interested. Another post is coming soon!


No comments:
Post a Comment