Saturday, February 18, 2017

Star Speeder 3000 - Toy to Model

 I recently came across this pretty great little pullback toy on clearance at a Disney store. For $2.99 they are a pretty decent representation in plastic of the Star Speeder 1000/3000 form Star Tours. 

I've always been keen on owning a nice scale representation of the star tours ship so I grabbed one figuring I could do some work and bring it up to snuff, it turned out to be a nice spare time project.
 The body itself for the most part was able to remain unchanged. The panel lines are a little deep, but I planned on hitting it with some automotive filler primer and doing a bit of sanding anyway to get rid of the ever-so slightly grainy texture of the surface. I also decided pretty early on to define a scale for it and potentially get rid of the R2 unit. The R2 put it at about 1/100 scale but I settled on something that would fit in with my other models so I'm calling it 1/144, also makes it a little beefier for a 40 person space bus.
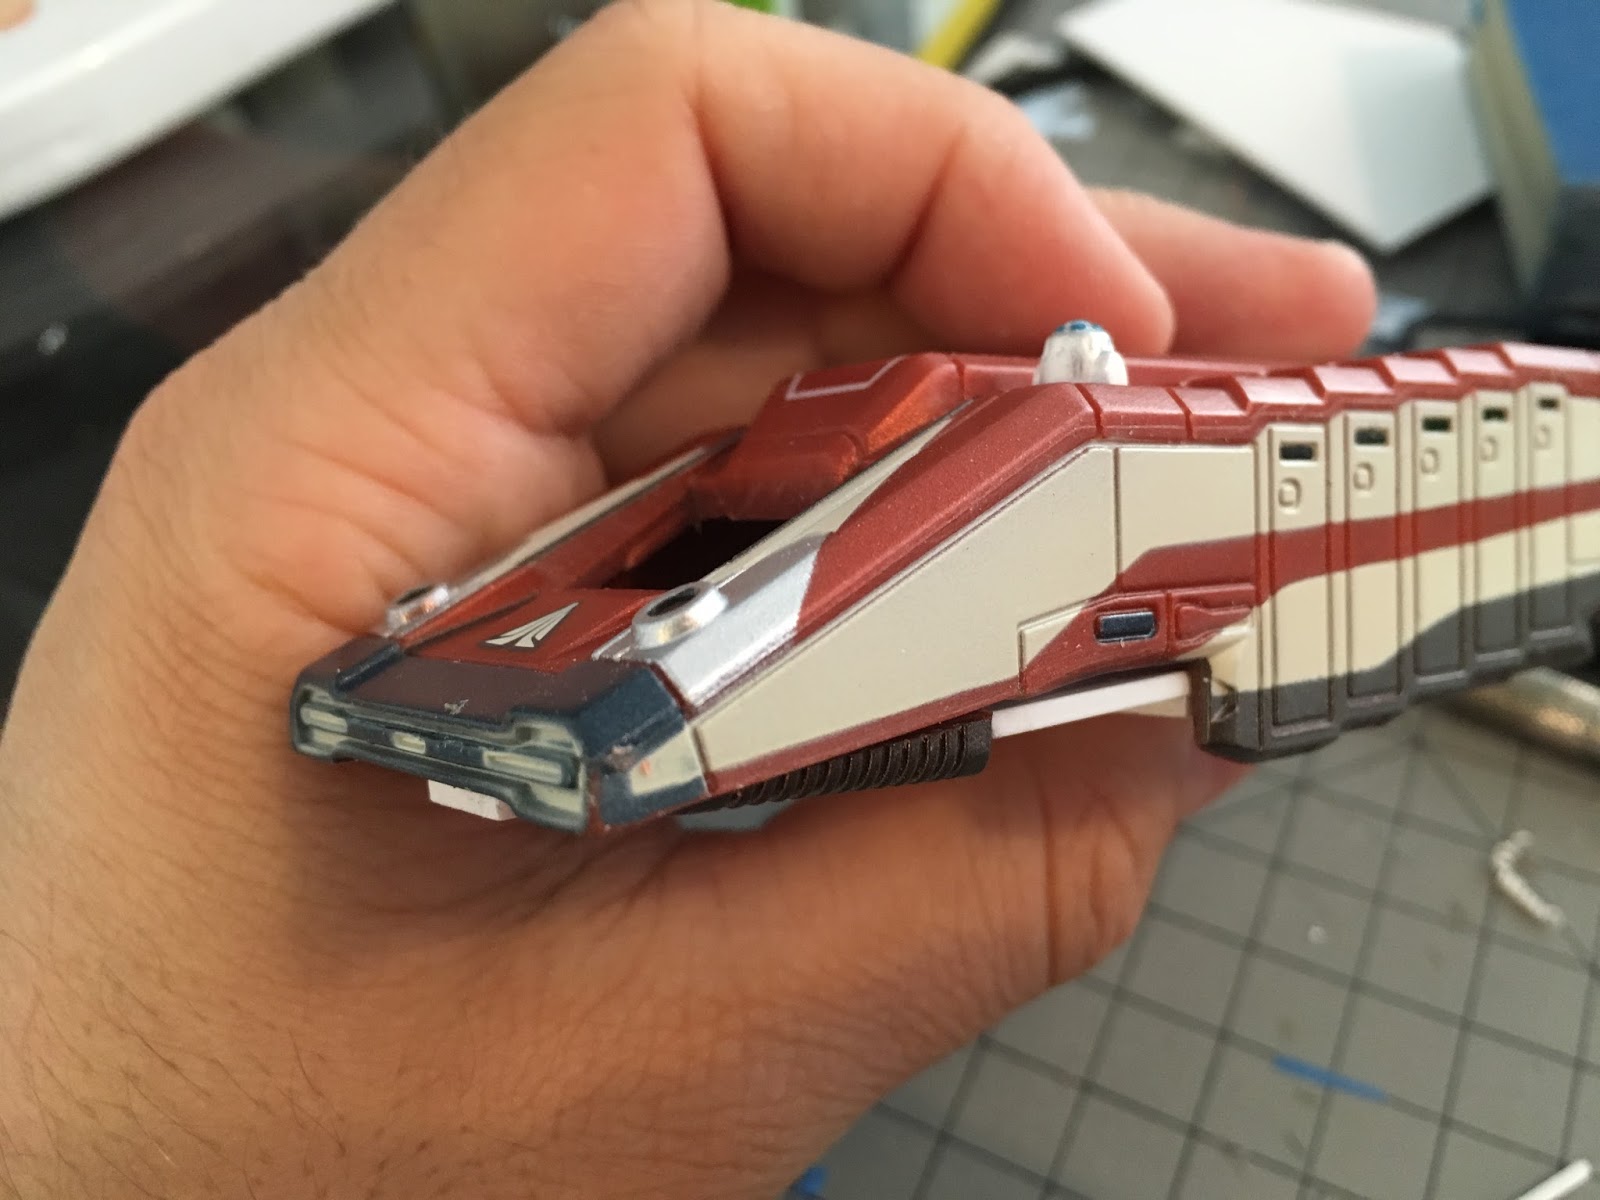
 The two worst areas of detail representation on the toy were the rear which was rounded and soft and the bottom of the ship which was somewhat simplified and a little inaccurate due to the pullback toy feature. I decided that it would be easiest to simply remove the bottom and start from scratch as well as cut away the rear end and simply build that up from styrene as well. In addition I would start by cutting out the front window and building a rudimentary interior.
Looking at the underside, one can see that the rather large cannons under the nose of the ship would need to be scratch built. I was able though to save certain parts here and there like the big vents under the chin of the ship on either side, although they would have to be completely relocated. 

I can't say enough about Star Wars Chronicles and how handy it comes in when working on a project like this. The Star Speeder is fairly well represented and there are plenty of great shots of it. This worked out to be a lifesaver when looking for reference on all the little bits and bobs all over the ship.

 The bottom of the ship was based around a 1mm styrene panel.
 The panel was then cut into shape to work with some of the greeblies that will soon occupy the space.
 The large chin vents were remounted onto the styrene panel up underneath the ship, closer to reference shots.
 The large 'backpack', 'AC unit', whatever it is, on top of the ship was able to be unscrewed and I proceeded to cut off the 'horn' that sticks out in front of it. It will need to be rebuilt from scratch longer and much thinner, as well as in the correct shape.
 After getting a rudimentary start on the bottom of the ship and getting most of the offensive areas removed, I turned my attention to the rear of the ship and the engine bank. I didn't photograph the whole process of building ip the engine panel, mostly because it went pretty quickly. This was definitely an area I was keen to get accurate.
 Things were built up using an assortment of styrene sheets and textured panels in various patterns and thicknesses.

 I was quite intrigued by the shapes of the engine cluster and the kit bashing used on the original model, some things I had thought were not very interesting about the craft grew on me more and more as I worked on it, funnily enough a fan of the Original Star Trek I actually found some funny similarities between this ship and the Starfleet shuttlecraft. I've always been pretty keen on the Star Speeder though, this really wound up being a long awaited and very fulfilling project.

 Here's is a small comparison of the original back panel and its almost complete replacement.

With that I'll likely wind up this first post as there is PLENTY more to come. Overall there is enough good in this little toy that it was pretty easy to get a nice momentum going with the build and seeing my progress kept me interested. Another post is coming soon!

Saturday, January 21, 2017

Marvel Universe Action Figure Customs -Eternity

Without a doubt one of the most interesting looking characters in the Marvel pantheon, I knew I had to add this cosmic entity to my collection. I waffled back and forth on how I wanted to make him for a few years, always thinking about working on one of the old Marvel Legends icons silver surfer bucks like so many had done before.

What it all boiled down to was either waiting for the custom to be perfect or wanting to get it done, and I wanted to get it done. I had scrapped some test pieces I had made and a fabric cape and started in on a Marvel Titan hero figure I got on sale for $7.99. These guys are actually great for crafting some of the larger cosmic characters that don't do much but stand around, I wound up picking up another one to make The Living Tribunal.


I started by sanding down some raised features from the Electro head (I know, I know, I left the ears, but they didn't really bother me, and they still don't) such as the lightning bolts on his forehead. All the cut and sanded areas were then polished with finer and finer grits of sandpaper and finally smoothed and cleaned with acetone.

The figure was washed with a mild dish detergent to remove hand oils and mold release agents. I can't bring up enough how important it is to do this BEFORE PAINTING. It's terrible to nearly complete a custom figure, finish painting some details and rip half the paint off with your masking tape. Trust me, spend five minutes washing it in the kitchen, let it dry for a few hours, THEN begin your painting.

The rubbery bits of plastic (Head and hands) were primed with Tamiya gray primer brushed on from a jar. It dries ultra fast so he was ready to paint in quick order. I painted his main under coat with Model Master black gloss lacquer from a spray can. He was then sprayed in a foggy pattern over the whole body with a metallic blue lacquer.


I followed up the spray paint with some airbrush work, trying my best to give him the look of the famous "Pillars of Creation" Hubble image. I used yellows, blues, fluorescent red all sprayed to give him cloudy nebulous look. In the meantime I stayed away from certain areas and made sure other areas carried over between his arms and cape.

Speaking of the cape, this one was made from plastic as I was able to achieve a desired effect of transparency with it. His headpiece and cape were both cut from an old action figure package and then heated over the stove until they began to droop, they were then formed over the figures body to give them some shape. I loved being able to make the pieces slightly transparent during painting and the effect looks killer in person with light behind him.


Once areas were blocked in with the airbrush, good old fashioned brush painting began. Using many of the same colors as I airbrushed, edges were delineated, more tiny effects were added and finally Stars were picked out throughout. I also gave certain of the stars a lens flare effect to bring them ever closer to my reference photos. Finally he was coated with a few layers of Future floor polish run through the airbrush. This gave him great shiny factory finish.


All in all I wound up thrilled with this big guy. He looks great on the shelf with his cosmic brethren and after about 5 years he's finally done. As a bonus it also gave me the jumpstart to finish the Living Tribunal as well. He is featured in two of the shots with his head mounted and his neck trimmed down to the shoulders and the resulting hole blanked off with sheet styrene. After I sculpt the rest of the head, probably in Apoxie Sculpt, I'll begin painting  and final assembly.


Custom Action Figures- General Hurst Romodi

After watching Rogue One a few times I have had the uncontrollable urge to begin completion of certain subjects of my action figure collecting. I went back and started gathering some more of the Imperial officers present at the Death Star briefing in A New Hope. Fortunately Hasbro tackled a few of the officers in their SAGA boxset. Aside from the box set there had been a fantastic figure of Admiral Motti made during POTF2 which I customized and wrote about in a previous blog entry. But we were still missing General Hurst Romodi who popped up again in Rogue one as well as Trech Molock. Also on my list of figures to make are two of the Imperial Security Bureau officers that walk by the Death Star elevators in A New Hope.

 General Romodi would be the first of the two ANH officers that I would tackle to complete the briefing. Facilitating this is the (I think) Fantastic Director Krennic body that came out in the new Rogue One toy-line. Do I wish it had more than 5 Points of articulation? Sure do. But am I happy with it as an easy base to customize Imperial Officers? ABSOLUTELY!!! The base figure has great proportions a nice detailed sharp sculpt and can be easily modified and painted.

After trimming off the holster from his skirt portion his whole body was sanded with a fine grit sanding pad and he was then washed with a mild kitchen soap to remove any oils and release agents he may have had from handling and molding. His rank badge was trimmed in half to get a single row of six studs.

I had to source a new head for him and luckily I had a Vintage Collection Darth Sidious head rolling around in my spares box (His body was turned into the ROTJ Emperor in a previous blog entry). The head had all the hair trimmed off including eyebrows and was then sanded down and smoothed with a q-tip soaked in lacquer thinner. He was then completely repainted except for his eyes. I declined to sculpt his very thin hair opting instead to simply paint it on with an ultra fine brush in layers to give it the look I wanted to achieve. I looked to reference from the new Rogue One Visual Guide for how to paint his features, as well as any reference stills I could find of the original character form ANH. I think I wound up striking a nice balance.


Paints used were all Testors Model Master acrylics. They had great adhesion once the plastic was washed and sanded. They also brush on wonderfully smooth. Neutral gray was used on the fabric portions of his uniform, it strikes a nice balance with the grays of the other officers from Hasbro. His uniform was also shaded in some deep areas with Vallejo model color paints, Green-Grey and Grey Black, to add some visual interest. He was finished off with a light coat of Krylon Matte spray to seal him up and help avoid paint rub.


Next up were the two gentleman from the Imperial Security Bureau. They were painted to a lesser degree, but were still a fun 2 day project. I began again with the awesome Krennic body from the 5 POA line.They had their holsters cut off and the skirt portions were sanded and smoothed with lacquer thinner. The badges were cut off, which in retrospect was not the greatest choice, while I made replacements form styrene, they came out a little chunky in comparison. I plan to potentially redo them at some point.


The officers also had belt boxes added made from styrene chips. I had looked at options for adding hats to the figures and pricing it out, I just didn't want to spend the money on trying to get heads wearing hats, whether they be resin casts or plucked form fodder figures. SO I sculpted the hats from Apoxie Sculpt. I wound up really happy with them. Once cured, the circular hat device was added from a slice of styrene rod. The heads themselves are both Indiana Jones heads from the 2008 figure line. They fit perfectly onto the bodies, and with some slight mods and paint (Bushy 70's sideburns were important!) they looked different enough next to each other, one had a mustache added with Apoxie Sculpt.


All in all, these three figures make a great addition to the imperial side of things and I'm super excited to continue finishing off some more baddies using the new figures from Rogue One. Ahead on my slate I'd like to try to make some more officers seen throughout the Death Star, including the officers wearing pants and shoes instead of breeches and boots, i'd also like to take a stab at the greatcoat officers seen on Jedha before the Death Star attack.

Coming up sooner than that are my Grand Moff Tarkin repaint, Trech Molock and my more articulated K-2SO, as well as some Marvel Comics custom figures.

Monday, August 31, 2015

Custom Action Figures - Imperial Officers (Admiral Motti/Captain Piett)

For whatever reason, I absolutely love the Imperial Officers of the original Star Wars films. In recent years we have been lucky to get a fair few officers in one form or another and most of them have been pretty good. In fact I actually quite liked even the Admiral Motti figure that was made way back in POTJ. He had a tremendous facial sculpt and his articulation was clean and necessary, he could do exactly what he did in the movie.


Over the years though I was able to acquire a few extra Captain Needa bodies and said what the hell, Removing the old Motti head I dremelled it out and mounted it on the new body. I also cut away his rank plate and glued it into place on the Needa body, his hands were replaced with some from the spares box. Now he can take his place next to Grand Moff Tarkin as they threaten to blow up planets.


Admiral/Captain Piett is another figure who seems a bit underrepresented in the modern toy line. He had quite a role in two movies yet has only had one figure made of himself in all this time. Like Motti the sculpt is quite good on his one release so I figured I would simply repurpose the POTF2 head. Little else is done to him, his rank badge is adequate to depict him in either film and the Needa figure was wearing gloves so that essentially completed his look.


Overall, these were some simple and quick modifications that helped to bring these characters into the new millennium, and fit them into the modern lineup.

Custom Action Figure- Imperial Probe Droid


 A character that has been in dire need of an update for years... yet never seems to get one. The Imperial Probe droid or Probot is in my opinion one of the most maligned characters in the entire Star Wars line.  This isn't some cantina character or background player in Jabba's palace. This guy's appearance opens The Empire Strikes Back and he plays an integral role in the plot.


Fortunately in spite of it's many faults the oft released POTF2 Probot is actually quite a good base to begin modifying into a more accurate figurine. He has all the basic parts and really just needs a few basic tweaks to bring him up to snuff.


Beginning with removing his obtrusive action featureHe can then have his head mounted to the body and can be puttied and sanded to remove some of his larger glaring seams. At this point it is great to pull out the reference material and figure out where everything belongs and what needs to be added to  accurize him.


I worked on smoothing and adding an eye here or there which was definitely needed. Also I deepened some of the rivet holes peppering his armor plates. Then I proceeded to begin placing Greeblies around the perimeter of his main body.


Various parts like miniature tanks and wires were fabricated from styrene sheet and rod and glued to him using cyanoacrylate. His neck was extended with a styrene spacer.


 Again more details were added and holes were cleaned out with a pin vise.


This panel was cut out and deepened and a new faceplate was made for it which matched reference photography. Also greeblies were assembled to replicate his little blaster mounted on top of his body. A small underhanging greeblie was also built which hangs off the lower edge of his trunk.


Looking directly underneath a large styrene blank was cut and shaped to cover the large recess on the bottom of his body left over from his action feature. This area is relatively undetailed on the actual miniature so it was left smooth.


The legs were pretty great if unarticulated but they still feature some nice crisp detailing. However in the pursuit for more accuracy and a better looking figure, I drilled out all the pistons on his legs and replaced them with small steel nails. The legs were all removed and the bare metal nails masked before painting.


Finally it was time to paint! A base coat of Rustoleum Anodized Bronze was applied to the whole figure, this was left to dry for 24 hours. Ordinarily I wouldn't use enamel spray paint on an action figure due to it reacting poorly with the base plastics used. Luckily the Probe Droid is made of sterner stuff and could take the heavier paint. Once dry I applied a wash of acrylic black over the whole figure and then very lightly dry brushed with gunmetal over the whole figure. The details were picked out with gloss black for the eyes and the small technical markings throughout were painted with a bright orange. Finally it was all sealed and the figure was reassembled.


As a finishing touch, two pins were cut to length and glued in place as antennas. He turned out pretty good looking if I say so myself and makes for a great updated piece in my collection, for not much more than 10 dollars.

Custom Action Figure- The Emperor


Here's another very necessary custom. The Emperor! Hard to believe I had to resort to this, but I have just never been satisfied by any of the commercially available Emperor figures. In fact the closest thing to a fantastic toy he has had is actually the Hallmark ornament of him in his chair. I display that proudly amongst his many cronies. But as far as a standing emperor I had to customize to get what I wanted.


Starting with the VC79 Vintage Collection Darth Sidious as a base I proceeded to ditch his Palpatine head and replace it with something a little more withered. The best ROTJ sculpt I have seen is actually the SAGA release of the Emperor from 2003. Usually this sculpt is marred by a godawful paint job but underneath all that is is incredibly faithful to his onscreen look. Nice and crisp.  The only real problem is that it is an incomplete head. But once placed under the hood, it makes no difference.


Further alterations to the VC79 Sidious included trimming and shaping the plastic cowl around his head. Also adding his cane from the SAGA Figure. Finally his cloak was soaked in warm water then shaped and left to dry. Lastly all the flesh parts were painted to match his onscreen look. My favorite thing about him is the dry papery look that I achieved with his skin. I hated the way the prequels made him look rubbery and lumpy rather than ancient and dessicated.


Custom Action Figure - Jango Fett


My custom Jango Fett is something I have wanted to complete for a LONG time now. I loved the new Vintage Collection body, but I was sick of the removable helmet because it looks so squished and nothing like the one used in the movie. However the mission series figure had a great looking head. Nice and wide like the actual film helmet, also it had great bright silver paint apps and nice bright detailing. As a bonus it came with Jango's arena jetpack, of which I didn't have one yet.


After chopping off Jango's head (Look ma just like Mace Windu!) I dremelled out the underside and added a cavity for the neck balljoint to fit into.


His Arena Jetpack was relatively under detailed, so I wound up repainting the whole thing. It is worth noting that Testers Model Master Acrylic Steel is a perfect match for the factory silver color of Jango's armor. While I was dremelling his helmet I also drilled out his jetpack rocket nozzles.


 The only real tweaks I had to make to the helmet were to paint his blue stripe around the back and to
paint black on the underside that was ground out .


The final addition to this figure was sort of another bonus from the Mission series figure. Jango's blasters were replaced with those of the mission series figure. They had a great bright silver color to them and the only thing I did to change them was to add some clear orange to the tip and the sides of the barrels to give them a coppery look. I then cut off the Blades from his gauntlets and called this one finished. I finally have my ultimate Jango Fett figure and the best part is I can still swap his parts out with all his original bits.